M1 Mac に Node.js のバージョンを簡単に切り替えられる nodenv をインストールする
プロジェクトごとにNode.js のバージョンを簡単に切り替えられる nodenv をインストールしてみます。
環境
- MacBook Pro 2021
nodenv のインストール手順
インストールの手順は 公式 を利用します。
Homebrew で nodenv をインストール
$ brew install nodenv
シェルへの設定
利用しているシェルへ設定を追加します。
こちらの環境では zsh を利用しているので、~/.zshrc に設定を加えます。
eval "$(nodenv init -)"
シェルへの設定反映
コンソールを開き直すか、下のコマンドで設定を反映します。
source ~/.zshrc
インストールされたか検証する
curl -fsSL https://github.com/nodenv/nodenv-installer/raw/master/bin/nodenv-doctor | bash
Checking for `nodenv' in PATH: /opt/homebrew/bin/nodenv
Checking for nodenv shims in PATH: OK
Checking `nodenv install' support: /opt/homebrew/bin/nodenv-install (node-build 4.9.64)
Counting installed Node versions: none
  There aren't any Node versions installed under `/Users/xxxxxx/.nodenv/versions'.
  You can install Node versions like so: nodenv install 2.2.4
Auditing installed plugins: OK
エラーが出ていなければインストール完了です!
nodenv を使って任意の Node.js バージョンをインストールする
noenv が入りましたので、任意の Node.js バージョンをインストールします。
今回は投稿時点での推奨版(LTS)バージョンである 16.13.1 をと、14系の最新版である 14.18.2 をインストールします。
Node.js のインストール
インストール済みの Node.js バージョンを確認する
まずは手元の環境にインストールされている Node.js バージョンを確認します。
$ nodenv versions
Warning: no Node detected on the system
まだ、どのバージョンも入っていなければ上記のように表示されます。
インストール可能なバージョンを確認する
ズラーッと表示されますが、お目当ての 16.13.1 辺りだけを抜粋して記載しておきます。
$ nodenv install -l

(中略)
14.17.5
14.17.6
14.18.0
14.18.1
14.18.2
(中略)
16.0.0
16.1.0
16.2.0
16.3.0
16.4.0
16.4.1
16.4.2
16.5.0
16.6.0
16.6.1
16.6.2
16.7.0
16.8.0
16.9.0
16.9.1
16.10.0
16.11.0
16.11.1
16.12.0
16.13.0
16.13.1
17.0.0
17.0.1
17.1.0
17.2.0
17.3.0
(後略)
Node.js のインストール
16.13.1 をインストールします。
$ nodenv install  16.13.1
Downloading node-v16.13.1-darwin-arm64.tar.gz...
-> https://nodejs.org/dist/v16.13.1/node-v16.13.1-darwin-arm64.tar.gz
Installing node-v16.13.1-darwin-arm64...
Installed node-v16.13.1-darwin-arm64 to /Users/xxxxxx/.nodenv/versions/16.13.1
14.18.2 をインストール
14.18.2 もインストールします。
nodenv install  14.18.2
Downloading node-v14.18.2.tar.gz...
-> https://nodejs.org/dist/v14.18.2/node-v14.18.2.tar.gz

WARNING: node-v14.18.2 is in LTS Maintenance mode and nearing its end of life.
It only receives *critical* security updates, *critical* bug fixes and documentation updates.

Installing node-v14.18.2...
無事にインストール、と思ったら、Installing から進まなくなってしまいました。
どうやら、v14 系はarm版対応していないようです。
調べてみると、Rosetta2 を介してインストールできるようです。
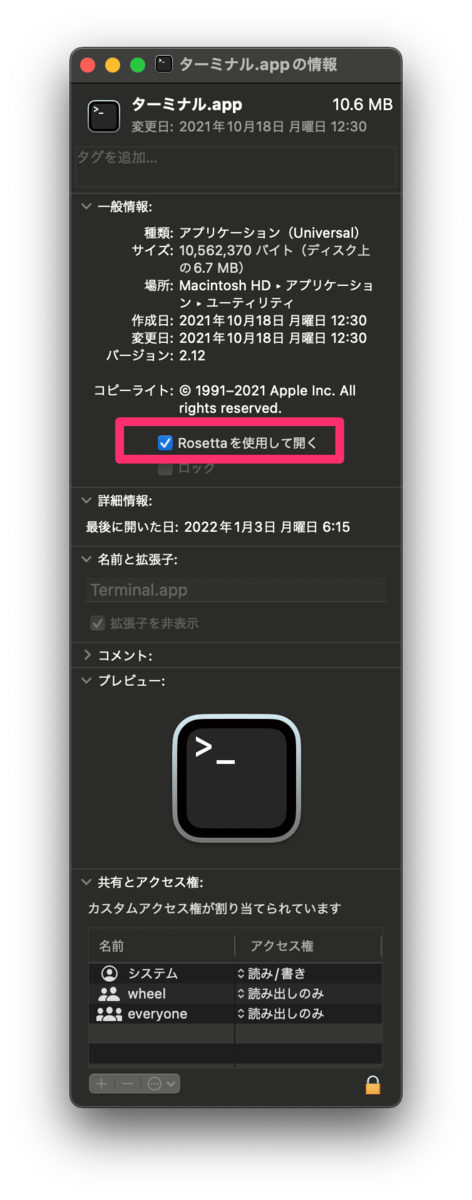
Mac 標準のターミナルアプリで Rossetta2 を使えるようにします。
Finder で アプリケーション -> ユーティリティ -> ターミナル.app -> 右クリックで「情報を見る」を選択 -> 「Rosetta を使って開く」をオンにする
ターミナルを使って 14.18.2 をインストールします。
nodenv install  14.18.2
nodenv: /Users/xxxxxx/.nodenv/versions/14.18.2 already exists
continue with installation? (y/N) y
Downloading node-v14.18.2-darwin-x64.tar.gz...
-> https://nodejs.org/dist/v14.18.2/node-v14.18.2-darwin-x64.tar.gz

WARNING: node-v14.18.2-darwin-x64 is in LTS Maintenance mode and nearing its end of life.
It only receives *critical* security updates, *critical* bug fixes and documentation updates.

Installing node-v14.18.2-darwin-x64...
Installed node-v14.18.2-darwin-x64 to /Users/xxxxxx/.nodenv/versions/14.18.2
今度こそ、無事にインストールされました! これでターミナル以外のコンソールアプリ(iTerm2 など)からも利用できます。
インストールしたバージョンを反映する
nodenv rehash コマンドを実行してインストールしたバージョンを nodenv に反映します。
nodenv rehash
nodenv versions コマンドでインストールされたバージョンを確認します。
nodenv versions
  14.18.2
  16.13.1
2つともインストールされましたね。
Node.js のバージョンを切り替える
システム全体で利用する Node.js バージョンと、特定のディレクトリ以下で利用するバージョンを設定できます。 プロジェクトで特定のバージョンを利用する場合に使えますね。
まずはシステム全体で利用するバージョンを設定
$ nodenv global 16.13.1
$ node -v
v16.13.1
特定のディレクトリで利用するバージョンを設定
$ mkdir ~/tmp/sample-project && cd ~/tmp/sample-project
$ nodenv local 14.18.2
$ node -v
v14.18.2
$ cd ..
$ node -v
v16.13.1
特定のディレクトリを外れるとシステム全体で利用するバージョンが適用されます。
nodenv rehash を自動化する
nodenv で Node.js バージョンをインストールした時にいちいち nodenv rehash コマンドを実行するのが面倒なので、自動化するように設定します。
スクリプトをインストールして
$ git clone https://github.com/nodenv/nodenv-package-rehash.git "$(nodenv root)"/plugins/nodenv-package-rehash
~/.zshrc に書いたシェルへの設定を書き換えておきます。
- eval "$(nodenv init -)"
+ eval "$(nodenv init - --no-rehash)"
再度コンソールを開き直すか設定を反映して、下記のコマンドを実行すれば設定完了です。
$ nodenv package-hooks install --all
AWS CLI をインストールしてみる
今回は AWS CLI をインストールして、アカウント設定をしてみます。
AWS CLI 本体のインストール
こちらのドキュメントをもとにインストールします。 バージョン1系と2系がありますが、新しい方のバージョン2系をインストールします。
まずはインストールパッケージのダウンロードから。
% cd ~/tmp
% curl "https://awscli.amazonaws.com/AWSCLIV2.pkg" -o "AWSCLIV2.pkg"
  % Total    % Received % Xferd  Average Speed   Time    Time     Time  Current
                                 Dload  Upload   Total   Spent    Left  Speed
100 26.1M  100 26.1M    0     0  13.4M      0  0:00:01  0:00:01 --:--:-- 13.4M
インストールを実行します。
% sudo installer -pkg AWSCLIV2.pkg -target /
Password:
installer: Package name is AWS Command Line Interface
installer: Installing at base path /
installer: The install was successful.
AWS CLI のインストール検証
aws コマンドが実行可能かを確認します。
% which aws
/usr/local/bin/aws
% aws --version
aws-cli/2.4.6 Python/3.8.8 Darwin/21.1.0 exe/x86_64 prompt/off
インストールはあっさり完了です。
アカウント設定
次にアカウント設定を行います。 こちらも公式ドキュメントを基に設定します。
予め、AWS コンソールで作成したユーザーの認証情報をCSVファイルでダウンロードしておきます。
設定するアカウントにはプロファイル名を付けることで、複数アカウント利用時に使い分けられるようにします。
今回は dev-user というプロファイル名を付けて設定します。
- 設定項目
% aws configure --profile dev-user
AWS Access Key ID [None]: XXXXXXXXXXXXXXXXX
AWS Secret Access Key [None]: XXXXXXXXXXXXXXXXXXXXXXXXXXXXX
Default region name [None]: ap-northeast-1
Default output format [None]: json
エラーが表示されなければ、正常に設定できています。
アカウント設定の検証
アカウント設定が問題ないかを確認します。
今回は aws s3 コマンドを使って、登録されている S3 バケット名を表示します。
% aws s3 ls --profile dev-user
2021-12-18 09:35:52 cf-templates-xxxxxxxxxxx-ap-northeast-1
2021-11-14 22:08:20 xxxxxxx-sample-bucket
2020-06-20 04:46:20 yyyyyyy-example-bucket
(後略)
作成済みの S3 バケットが表示されていれば設定完了です!
MacBook Pro から GitHub へのアクセスを SSH 経由となるよう設定する
前回は、Docker コンテナ上にパブリックベータ公開された Nuxt.js v3 のテンプレートアプリを構築してみました。
今回は、開発マシン(MacBook Pro)から、ソースコードなどを保管する GitHub リポジトリへ SSH 経由で接続するように設定します。
GitHub へ SSH(Secure Shell:セキュアシェル)で通信経路を暗号化して接続するには、開発マシンで暗号化認証用の公開鍵と秘密鍵を作成し公開鍵を GitHub へ登録する必要があります。
開発マシンで公開鍵と秘密鍵を作成する
開発マシンである MacBook Pro 上で公開鍵と秘密鍵を作成します。
SSH 関連の設定や鍵は、~/.ssh ディレクトリに配置するのがお決まりなので、ここが作業ディレクトリとなります。
cd ~/.ssh
ssh-keygen コマンドで鍵を作成します。
複数のアカウントで SSH 接続する場合に備えて、コメントにアカウントID(ここではメールアドレス)を入れておくと後で見分けやすいです。
鍵のファイル名にもアカウントを識別できるようにしておくと、更に分かりやすいです。
ssh-keygen -t rsa -b 4096 -C "xxxxxx@example.com" -f ~/.ssh/id_rsa_xxxxxx_example
Generating public/private rsa key pair.
Enter passphrase (empty for no passphrase):
Enter same passphrase again:
Your identification has been saved in /Users/xxxxxx/.ssh/id_rsa_xxxxxx_example
Your public key has been saved in /Users/xxxxxx/.ssh/id_rsa_xxxxxx_example.pub
The key fingerprint is:
SHA256:xxxxxxxxxxxxxxxxxxxxxxxxxxx/xxxXXX/XXXxxx xxxxxx@example.com
The key's randomart image is:
+---[RSA 4096]----+
|       .xxxxxxxxxx
|       . yyyyyyyyy
|        =zzzzzzzzzz
|       . X.  o . Z
|        X = . Y  |
|       Y = + = + |
|      . . o . o  |
|       .     o   |
|            .o+. |
+----[SHA256]-----+
chmod 600 id_rsa_xxxxxx_example
GitHub に登録する公開鍵をクリップボードにコピーします。
pbcopy < id_rsa_xxxxxx_example.pub
Add public key to GitHub
ここからは、GitHub サイト上での作業です。
ホーム画面から、Settings -> SSH and GPG keys -> New SSH Key と遷移して SSH 公開鍵を登録します。


SSH 接続設定
再び開発マシンで SSH 接続設定を行います。 SSH 接続設定は、~/.ssh/config ファイルに記載します。
vi config
github.com への接続設定を追加します。
Host github github.com
    User git
    Port 22
    HostName github.com
    identityFile ~/.ssh/id_rsa_xxxxxx_example
    TCPKeepAlive yes
    IdentitiesOnly yes
ssh-add コマンドで MacBook Pro に秘密鍵を登録しておきます。
ssh-add ~/.ssh/id_rsa_xxxxxx_example
Identity added: /Users/xxxxxx/.ssh/id_rsa_xxxxxx_example (xxxxxx@example.com)
SSH で接続できるかテストします。 初回接続時は known hosts に登録されていないので、登録するかが確認されます。
ssh -T git@github.com
The authenticity of host 'github.com (52.69.186.44)' can't be established.
ED25519 key fingerprint is SHA256:+xxxxxxxxxxxxxxxxxxxxxxxxxxxXXXXXXXXXX.
This key is not known by any other names
Are you sure you want to continue connecting (yes/no/[fingerprint])? yes
Warning: Permanently added 'github.com' (ED25519) to the list of known hosts.
Hi xxxxxx! You've successfully authenticated, but GitHub does not provide shell access.
正常に接続されていれば、最終行のように GitHub アカウントとして認証されたことが表示されます。
2回目以降は known hosts への登録確認がなく、認証されたことだけが表示されます。
ssh -T git@github.com
Hi xxxxxx! You've successfully authenticated, but GitHub does not provide shell access.
適当なリポジトリをクローンしてみましょう。
cd ~/tmp
git clone git@github.com:xxxxxx/portfolio.git
Cloning into 'portfolio'...
remote: Enumerating objects: 253, done.
remote: Counting objects: 100% (253/253), done.
remote: Compressing objects: 100% (193/193), done.
remote: Total 253 (delta 120), reused 153 (delta 52), pack-reused 0
Receiving objects: 100% (253/253), 3.15 MiB | 1.12 MiB/s, done.
Resolving deltas: 100% (120/120), done.
Docker コンテナ上に Nuxt 3 アプリを作って動かしてみる
前回は M1 MacBook Pro 上に Lima + Docker 環境を構築しました。
今回は、先日にパブリックベータ版が公開された Nuxt.js v3 (以下、Nuxt 3) のアプリを構築して動かしてみます。
Nuxt 3 について
前バージョンに比べて75倍も軽量となり高速化されているそうで、少し触ってみた限りではかなり早くなっていますね。 Vue 3 や、Composition API、TypeScript、内部 API のネイティブサポートに加え、Nuxt 2 からの移行サポートツールである Nuxt Bridge も用意されているので既存の Nuxt 2 アプリでも Nuxt 3 の新機能が利用できる様になっています。
アプリ構築手順
コンテナ設定
まずは、コンテナ周りの設定を行うため、設定ファイルを作成します。
cd ~/projects/Sandbox
mkdir nuxt3-app-on-docker && cd nuxt3-app-on-docker
mkdir front && touch front/Dockerfile
touch docker-compose.yml
まずは、Dockerfile から。
node.js の LTS 版である v16.13.1` を利用します。
FROM node:16.13.1

EXPOSE 3000
続いて、docker-compose の設定です。
ホットリロード(ソースコードを修正したら即反映)の設定や、Nuxt 3 で追加となったと思われる WebSocket 通信用のポート設定を入れています。
version: '3'
services:
  front:
    build: front
    volumes:
      - ./src:/app/src
    tty: true
    environment:
      # ホットリロード
      - CHOKIDAR_USEPOLLING=true
    ports:
      - '3000:3000'
      # WebSocket 通信用ポート
      - '24678:24678'
Lima からのディレクトリ書き込み権限追加
コンテナは Lima 上の Docker で動かすので、ホスト PC のディスクへ書き込みできるようゲスト VM に書き込み権限を追加します。
Lima のインスタンスは default として登録しているので、設定変更は ~/.lima/default/lima.yaml に対して行います。
元々設定にあった /tmp/lima に加え、 ~/projects 以下にも書き込みできるよう設定を追加します。
(前略)
mounts:
  - location: "~"
    writable: false
  - location: "/tmp/lima"
    writable: true
  - location: "~/projects"
    writable: true
(後略)
設定変更したら、ゲスト VM を再起動しておきます。
limactl stop default
limactl start default
コンテナ起動
実行前はコンテナが起動していません。
docker ps
CONTAINER ID   IMAGE     COMMAND   CREATED   STATUS    PORTS     NAMES
docker-compose コマンドでコンテナを起動します。
docker-compose up -d
Sending build context to Docker daemon     153B
Step 1/2 : FROM node:16.13.1
 ---> 94d4a84250fd
Step 2/2 : EXPOSE 3000
 ---> Using cache
 ---> 63d92f6ee14d
Successfully built 63d92f6ee14d
Successfully tagged nuxt3-app-on-docker_front:latest
[+] Running 1/1
 ⠿ Container nuxt3-app-on-docker-front-1  Started
コンテナが起動していることを確認します。
docker-compose ps
NAME                          COMMAND                  SERVICE             STATUS              PORTS
nuxt3-app-on-docker-front-1   "docker-entrypoint.s…"   front               running             0.0.0.0:3000->3000/tcp, 0.0.0.0:24678->24678/tcp, :::3000->3000/tcp, :::24678->24678/tcp
Nuxt 3 アプリの作成
Nuxt 3 アプリを構築するために、コンテナ内に入ってコマンドを実行できるようにします。
docker-compose exec front /bin/bash
今回は、公式ガイド にあるテンプレートアプリを作っていきます。
cd app/src/
npx nuxi init nuxt3-app
Need to install the following packages:
  nuxi
Ok to proceed? (y)
Nuxt CLI v3.0.0-27313139.1c88580
ℹ cloned nuxt/starter#v3 to /app/src/nuxt3-app
 🎉  Another dazzling Nuxt project just made! Next steps:

     📁  `cd nuxt3-app`

     💿  Install dependencies with `npm install` or `yarn install`

     🚀  Start development server with `npm run dev` or `yarn dev`
あっという間にテンプレートアプリが作成されました。
Nuxt 3 アプリの起動
続いて依存モジュールをインストールしてテンプレートアプリを動かします。
nuxt3-app という名称で作成したので、nuxt3-app ディレクトリに移動してインストールします。
cd nuxt3-app/
yarn install
1分ほどでインストールが終わりました。 インストールが終わったら、アプリを起動します。
yarn dev
Nuxt CLI v3.0.0-27313139.1c88580

  > Local:    http://localhost:3000/
  > Network:  http://172.19.0.2:3000/

ℹ Vite warmed up in 832ms
✔ Vite server built in 1563ms
✔ Nitro built in 180 ms
あっという間に起動しました。 Nuxt 3 で導入された Nitro Engine の効果か、起動がとても早くなりましたね。
起動したら http://localhost:3000/ にアクセスします。以下のように表示されていれば成功です!

確認が終わったらコンテナを止めて、
docker-compose stop front
イメージを削除して完了です!
docker-compose rm front
? Going to remove nuxt3-app-on-docker-front-1 Yes
[+] Running 1/1
 ⠿ Container nuxt3-app-on-docker-front-1  Removed
今回は Nuxt 3 のテンプレートアプリを作成して起動しただけですが、前バージョンよりはるかに動作が早くなったことを感じられました。 Nuxt 3 になってアプリ動作の高速化だけでなく、TypeScript や内部 API などがサポートされて開発スピードも向上しそうですね。
M1 MacBook Pro 2021 に Lima + Docker 環境をインストールする
背景
まずは個人開発をすすめるべく、開発環境を整えていきます。
今回は以下の状況や条件を踏まえて Lima + Docker の環境を作っていきます。
- Apple Silicon の M1 Macbook Pro を購入した
- Docker Desktop が有料化される(個人的には対象外ですが)
- Docker Desktop for Mac でのファイルシステムマウントが激遅なのを避けたい
- WSL (Windows Subsystem for Linux) のような Linux 仮想環境をつくりたい
環境
- MacBook Pro 2021
環境構築手順
Lima のインストール
brew でお手軽にインストールできます。
brew upgrade
brew update
brew install lima
Lima での ゲスト VM 作成
Lima の公式リポジトリ にはいろんな VM のサンプルが掲載されています。
その中から、docker-compose もインストールされるように 作られた VM の YAML ファイル を利用します。
cd ~/tmp
mkdir lima && cd lima
curl -o default.yaml https://raw.githubusercontent.com/chibiegg/lima-config/master/docker.yaml
cat default.yaml

# Example to use Docker instead of containerd & nerdctl
# $ limactl start ./docker.yaml
# $ limactl shell docker docker run -it -v $HOME:$HOME --rm alpine

# Hint: To allow `docker` CLI on the host to connect to the Docker daemon running inside the guest,
# add `NoHostAuthenticationForLocalhost yes` in ~/.ssh/config , and then run the following commands:
# $ export DOCKER_HOST=ssh://localhost:60006
# $ docker ...

# If ssh:// ... does not work, try the following commands:
# $ ssh -f -N -p 60006 -i ~/.lima/_config/user -o NoHostAuthenticationForLocalhost=yes -L $HOME/docker.sock:/run/user/$(id -u)/docker.sock 127.0.0.1
# $ export DOCKER_HOST=unix://$HOME/docker.sock
# $ docker ...

images:
  # Hint: run `limactl prune` to invalidate the "current" cache
  - location: "https://cloud-images.ubuntu.com/hirsute/current/hirsute-server-cloudimg-amd64.img"
    arch: "x86_64"
  - location: "https://cloud-images.ubuntu.com/hirsute/current/hirsute-server-cloudimg-arm64.img"
    arch: "aarch64"
mounts:
  - location: "~"
    writable: false
  - location: "/tmp/lima"
    writable: true
ssh:
  localPort: 60006
  # Load ~/.ssh/*.pub in addition to $LIMA_HOME/_config/user.pub , for allowing DOCKER_HOST=ssh:// .
  # This option is enabled by default.
  # If you have an insecure key under ~/.ssh, do not use this option.
  loadDotSSHPubKeys: true
# containerd is managed by Docker, not by Lima, so the values are set to false here.
containerd:
  system: false
  user: false
provision:
  - mode: system
    script: |
      #!/bin/bash
      set -eux -o pipefail
      command -v docker >/dev/null 2>&1 && exit 0
      export DEBIAN_FRONTEND=noninteractive
      curl -fsSL https://get.docker.com | sh
      # NOTE: you may remove the lines below, if you prefer to use rootful docker, not rootless
      systemctl disable --now docker
      apt-get install -y uidmap
  - mode: user
    script: |
      #!/bin/bash
      set -eux -o pipefail
      dockerd-rootless-setuptool.sh install
      docker context use rootless
      sudo apt install -y docker-compose qemu-system-x86 binfmt-support qemu-user qemu-user-static
probes:
  - script: |
      #!/bin/bash
      set -eux -o pipefail
      if ! timeout 30s bash -c "until command -v docker >/dev/null 2>&1; do sleep 3; done"; then
        echo >&2 "docker is not installed yet"
        exit 1
      fi
      if ! timeout 30s bash -c "until pgrep rootlesskit; do sleep 3; done"; then
        echo >&2 "rootlesskit (used by rootless docker) is not running"
        exit 1
      fi
    hint: See "/var/log/cloud-init-output.log". in the guest
ゲスト VM の起動
limactl start default.yaml
? Creating an instance "default" Proceed with the default configuration
INFO[0023] Attempting to download the image from "https://cloud-images.ubuntu.com/hirsute/current/hirsute-server-cloudimg-arm64.img"  digest=
543.69 MiB / 543.69 MiB [-----------------------------------] 100.00% 9.21 MiB/s
INFO[0084] Downloaded image from "https://cloud-images.ubuntu.com/hirsute/current/hirsute-server-cloudimg-arm64.img"
INFO[0088] [hostagent] Starting QEMU (hint: to watch the boot progress, see "/Users/xxxxxx/.lima/default/serial.log")
INFO[0088] SSH Local Port: 60006
INFO[0088] [hostagent] Waiting for the essential requirement 1 of 5: "ssh"
INFO[0142] [hostagent] The essential requirement 1 of 5 is satisfied
INFO[0142] [hostagent] Waiting for the essential requirement 2 of 5: "user session is ready for ssh"
INFO[0142] [hostagent] The essential requirement 2 of 5 is satisfied
INFO[0142] [hostagent] Waiting for the essential requirement 3 of 5: "sshfs binary to be installed"
INFO[0143] [hostagent] The essential requirement 3 of 5 is satisfied
INFO[0143] [hostagent] Waiting for the essential requirement 4 of 5: "/etc/fuse.conf to contain \"user_allow_other\""
INFO[0146] [hostagent] The essential requirement 4 of 5 is satisfied
INFO[0146] [hostagent] Waiting for the essential requirement 5 of 5: "the guest agent to be running"
INFO[0146] [hostagent] The essential requirement 5 of 5 is satisfied
INFO[0146] [hostagent] Mounting "/Users/xxxxxx"
INFO[0146] [hostagent] Mounting "/tmp/lima"
INFO[0146] [hostagent] Waiting for the optional requirement 1 of 1: "user probe 1/1"
INFO[0146] [hostagent] Forwarding "/run/lima-guestagent.sock" (guest) to "/Users/xxxxxx/.lima/default/ga.sock" (host)
INFO[0146] [hostagent] Not forwarding TCP 127.0.0.53:53
INFO[0146] [hostagent] Not forwarding TCP 0.0.0.0:22
INFO[0146] [hostagent] Not forwarding TCP [::]:22
INFO[0173] [hostagent] The optional requirement 1 of 1 is satisfied
INFO[0173] [hostagent] Waiting for the final requirement 1 of 1: "boot scripts must have finished"
INFO[0214] [hostagent] Waiting for the final requirement 1 of 1: "boot scripts must have finished"
INFO[0214] [hostagent] The final requirement 1 of 1 is satisfied
INFO[0214] READY. Run `lima` to open the shell.
ホスト(macOS )に docker と docker-compose コマンドをインストールする
ホスト側である macOS から Lima のゲスト VM 上にあるコンテナを操作するため、docker と docker-compose コマンドをインストールします。
こちらも brew でかんたんにインストールできます。
brew install docker docker-compose
コマンドをインストールしただけではゲスト VM 上のコンテナにアクセスできませんので、SSH 経由でコマンドを実行できるようにします。
echo 'export DOCKER_HOST=ssh://limadocker:60006' >> ~/.zshrc

cat << EOS >> ~/.ssh/config
Host localhost
  HostName localhost
  User xxxxxx
  NoHostAuthenticationForLocalhost yes
  Port 60006
EOS

source ~/.zshrc
うまくいくかと思ったら、SSH がうまく通っていないようでした。
docker version
Client: Docker Engine - Community
 Version:           20.10.11
 API version:       1.41
 Go version:        go1.17.2
 Git commit:        dea9396e18
 Built:             Wed Nov 17 23:49:46 2021
 OS/Arch:           darwin/arm64
 Context:           default
 Experimental:      true
error during connect: Get "http://docker.example.com/v1.24/version": command [ssh -p 60006 -- localhost docker system dial-stdio] has exited with exit status 255, please make sure the URL is valid, and Docker 18.09 or later is installed on the remote host: stderr=xxxxxx@127.0.0.1: Permission denied (publickey).
調べてみると、SSH 設定を表示してくれるコマンドがある ようです。
limactl show-ssh --format=(cmd|args|options|config) INSTANCE
インスタンス名は default 、出力フォーマットは ~/.ssh/config 用に config とします。
limactl show-ssh default --format=config
Host lima-default
  IdentityFile "/Users/xxxxxx/.lima/_config/user"
  StrictHostKeyChecking no
  UserKnownHostsFile /dev/null
  NoHostAuthenticationForLocalhost yes
  GSSAPIAuthentication no
  PreferredAuthentications publickey
  Compression no
  BatchMode yes
  IdentitiesOnly yes
  Ciphers "^aes128-gcm@openssh.com,aes256-gcm@openssh.com"
  User xxxxxx
  ControlMaster auto
  ControlPath "/Users/xxxxxx/.lima/default/ssh.sock"
  ControlPersist 5m
  Hostname 127.0.0.1
  Port 60006
表示された設定のうち、Host を lima-default から docker コマンド実行エラー時に表示されていたホスト名 localhost へ変えて ~/.ssh/config に記載しておきます。
改めて docker コマンドを実行してみるとエラーが解消されました!
docker version
Client: Docker Engine - Community
 Version:           20.10.11
 API version:       1.41
 Go version:        go1.17.2
 Git commit:        dea9396e18
 Built:             Wed Nov 17 23:49:46 2021
 OS/Arch:           darwin/arm64
 Context:           default
 Experimental:      true

Server: Docker Engine - Community
 Engine:
  Version:          20.10.11
  API version:      1.41 (minimum version 1.12)
  Go version:       go1.16.9
  Git commit:       847da18
  Built:            Thu Nov 18 00:35:20 2021
  OS/Arch:          linux/arm64
  Experimental:     false
 containerd:
  Version:          1.4.12
  GitCommit:        7b11cfaabd73bb80907dd23182b9347b4245eb5d
 runc:
  Version:          1.0.2
  GitCommit:        v1.0.2-0-g52b36a2
 docker-init:
  Version:          0.19.0
  GitCommit:        de40ad0
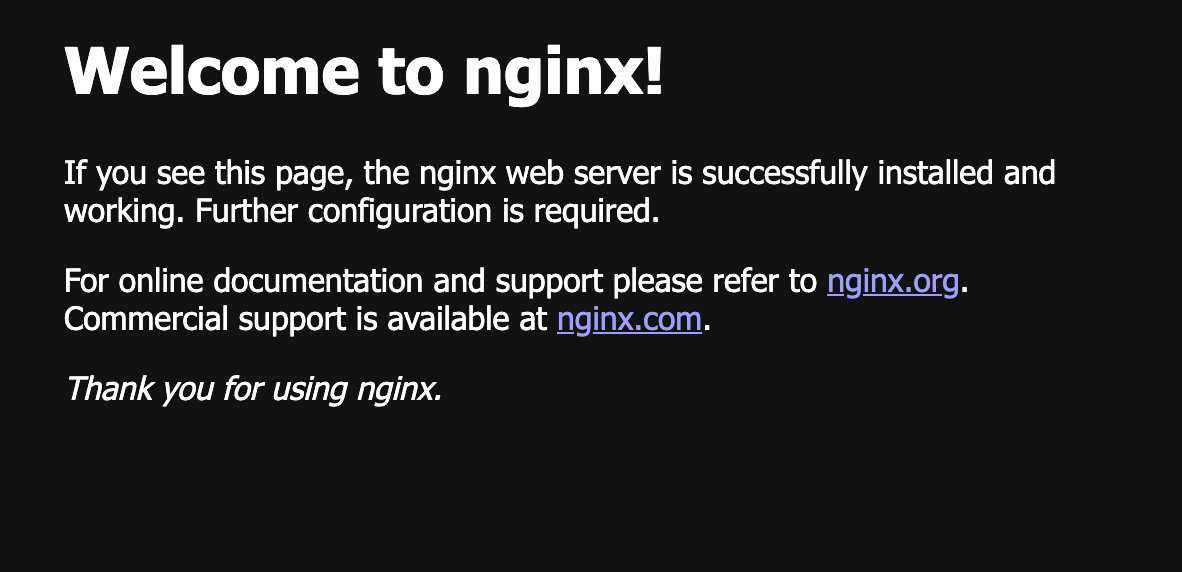
ゲスト VM 上でのコンテナの起動と動作確認
ゲスト VM 上でコンテナを起動します。今回は nginx が実行されるコンテナを起動して確認します。
docker run -it -p 8080:80 nginx:latest
/docker-entrypoint.sh: /docker-entrypoint.d/ is not empty, will attempt to perform configuration
/docker-entrypoint.sh: Looking for shell scripts in /docker-entrypoint.d/
/docker-entrypoint.sh: Launching /docker-entrypoint.d/10-listen-on-ipv6-by-default.sh
10-listen-on-ipv6-by-default.sh: info: Getting the checksum of /etc/nginx/conf.d/default.conf
10-listen-on-ipv6-by-default.sh: info: Enabled listen on IPv6 in /etc/nginx/conf.d/default.conf
/docker-entrypoint.sh: Launching /docker-entrypoint.d/20-envsubst-on-templates.sh
/docker-entrypoint.sh: Launching /docker-entrypoint.d/30-tune-worker-processes.sh
/docker-entrypoint.sh: Configuration complete; ready for start up
2021/12/06 08:50:34 [notice] 1#1: using the "epoll" event method
2021/12/06 08:50:34 [notice] 1#1: nginx/1.21.4
2021/12/06 08:50:34 [notice] 1#1: built by gcc 10.2.1 20210110 (Debian 10.2.1-6)
2021/12/06 08:50:34 [notice] 1#1: OS: Linux 5.11.0-41-generic
2021/12/06 08:50:34 [notice] 1#1: getrlimit(RLIMIT_NOFILE): 1048576:1048576
2021/12/06 08:50:34 [notice] 1#1: start worker processes
2021/12/06 08:50:34 [notice] 1#1: start worker process 32
2021/12/06 08:50:34 [notice] 1#1: start worker process 33
2021/12/06 08:50:34 [notice] 1#1: start worker process 34
2021/12/06 08:50:34 [notice] 1#1: start worker process 35
起動後にホスト側から http://localhost:8080 にアクセスできれば成功です!