M1 Mac に Node.js のバージョンを簡単に切り替えられる nodenv をインストールする
プロジェクトごとにNode.js のバージョンを簡単に切り替えられる nodenv をインストールしてみます。
環境
- MacBook Pro 2021
nodenv のインストール手順
インストールの手順は 公式 を利用します。
Homebrew で nodenv をインストール
$ brew install nodenv
シェルへの設定
利用しているシェルへ設定を追加します。
こちらの環境では zsh を利用しているので、~/.zshrc に設定を加えます。
eval "$(nodenv init -)"
シェルへの設定反映
コンソールを開き直すか、下のコマンドで設定を反映します。
source ~/.zshrc
インストールされたか検証する
curl -fsSL https://github.com/nodenv/nodenv-installer/raw/master/bin/nodenv-doctor | bash
Checking for `nodenv' in PATH: /opt/homebrew/bin/nodenv
Checking for nodenv shims in PATH: OK
Checking `nodenv install' support: /opt/homebrew/bin/nodenv-install (node-build 4.9.64)
Counting installed Node versions: none
  There aren't any Node versions installed under `/Users/xxxxxx/.nodenv/versions'.
  You can install Node versions like so: nodenv install 2.2.4
Auditing installed plugins: OK
エラーが出ていなければインストール完了です!
nodenv を使って任意の Node.js バージョンをインストールする
noenv が入りましたので、任意の Node.js バージョンをインストールします。
今回は投稿時点での推奨版(LTS)バージョンである 16.13.1 をと、14系の最新版である 14.18.2 をインストールします。
Node.js のインストール
インストール済みの Node.js バージョンを確認する
まずは手元の環境にインストールされている Node.js バージョンを確認します。
$ nodenv versions
Warning: no Node detected on the system
まだ、どのバージョンも入っていなければ上記のように表示されます。
インストール可能なバージョンを確認する
ズラーッと表示されますが、お目当ての 16.13.1 辺りだけを抜粋して記載しておきます。
$ nodenv install -l

(中略)
14.17.5
14.17.6
14.18.0
14.18.1
14.18.2
(中略)
16.0.0
16.1.0
16.2.0
16.3.0
16.4.0
16.4.1
16.4.2
16.5.0
16.6.0
16.6.1
16.6.2
16.7.0
16.8.0
16.9.0
16.9.1
16.10.0
16.11.0
16.11.1
16.12.0
16.13.0
16.13.1
17.0.0
17.0.1
17.1.0
17.2.0
17.3.0
(後略)
Node.js のインストール
16.13.1 をインストールします。
$ nodenv install  16.13.1
Downloading node-v16.13.1-darwin-arm64.tar.gz...
-> https://nodejs.org/dist/v16.13.1/node-v16.13.1-darwin-arm64.tar.gz
Installing node-v16.13.1-darwin-arm64...
Installed node-v16.13.1-darwin-arm64 to /Users/xxxxxx/.nodenv/versions/16.13.1
14.18.2 をインストール
14.18.2 もインストールします。
nodenv install  14.18.2
Downloading node-v14.18.2.tar.gz...
-> https://nodejs.org/dist/v14.18.2/node-v14.18.2.tar.gz

WARNING: node-v14.18.2 is in LTS Maintenance mode and nearing its end of life.
It only receives *critical* security updates, *critical* bug fixes and documentation updates.

Installing node-v14.18.2...
無事にインストール、と思ったら、Installing から進まなくなってしまいました。
どうやら、v14 系はarm版対応していないようです。
調べてみると、Rosetta2 を介してインストールできるようです。
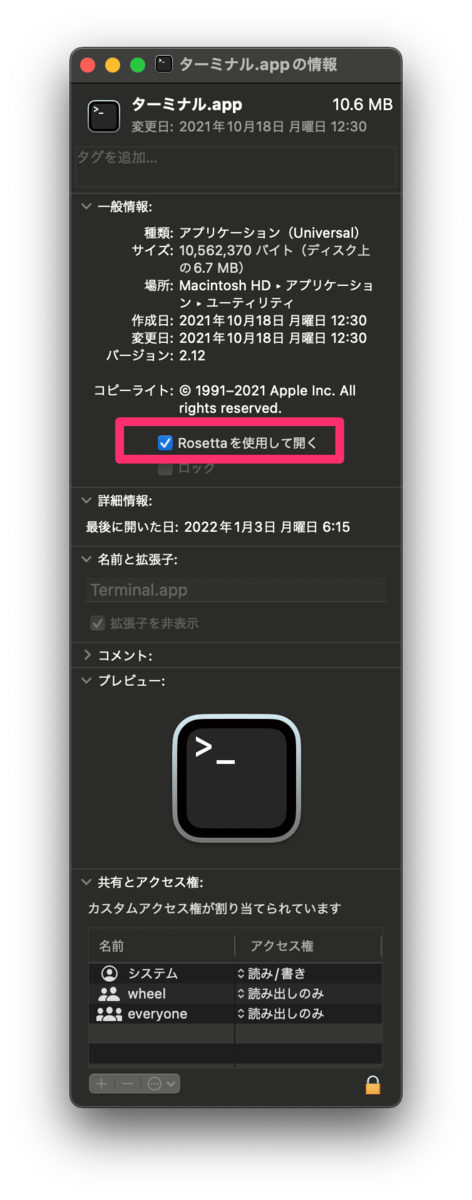
Mac 標準のターミナルアプリで Rossetta2 を使えるようにします。
Finder で アプリケーション -> ユーティリティ -> ターミナル.app -> 右クリックで「情報を見る」を選択 -> 「Rosetta を使って開く」をオンにする
ターミナルを使って 14.18.2 をインストールします。
nodenv install  14.18.2
nodenv: /Users/xxxxxx/.nodenv/versions/14.18.2 already exists
continue with installation? (y/N) y
Downloading node-v14.18.2-darwin-x64.tar.gz...
-> https://nodejs.org/dist/v14.18.2/node-v14.18.2-darwin-x64.tar.gz

WARNING: node-v14.18.2-darwin-x64 is in LTS Maintenance mode and nearing its end of life.
It only receives *critical* security updates, *critical* bug fixes and documentation updates.

Installing node-v14.18.2-darwin-x64...
Installed node-v14.18.2-darwin-x64 to /Users/xxxxxx/.nodenv/versions/14.18.2
今度こそ、無事にインストールされました! これでターミナル以外のコンソールアプリ(iTerm2 など)からも利用できます。
インストールしたバージョンを反映する
nodenv rehash コマンドを実行してインストールしたバージョンを nodenv に反映します。
nodenv rehash
nodenv versions コマンドでインストールされたバージョンを確認します。
nodenv versions
  14.18.2
  16.13.1
2つともインストールされましたね。
Node.js のバージョンを切り替える
システム全体で利用する Node.js バージョンと、特定のディレクトリ以下で利用するバージョンを設定できます。 プロジェクトで特定のバージョンを利用する場合に使えますね。
まずはシステム全体で利用するバージョンを設定
$ nodenv global 16.13.1
$ node -v
v16.13.1
特定のディレクトリで利用するバージョンを設定
$ mkdir ~/tmp/sample-project && cd ~/tmp/sample-project
$ nodenv local 14.18.2
$ node -v
v14.18.2
$ cd ..
$ node -v
v16.13.1
特定のディレクトリを外れるとシステム全体で利用するバージョンが適用されます。
nodenv rehash を自動化する
nodenv で Node.js バージョンをインストールした時にいちいち nodenv rehash コマンドを実行するのが面倒なので、自動化するように設定します。
スクリプトをインストールして
$ git clone https://github.com/nodenv/nodenv-package-rehash.git "$(nodenv root)"/plugins/nodenv-package-rehash
~/.zshrc に書いたシェルへの設定を書き換えておきます。
- eval "$(nodenv init -)"
+ eval "$(nodenv init - --no-rehash)"
再度コンソールを開き直すか設定を反映して、下記のコマンドを実行すれば設定完了です。
$ nodenv package-hooks install --all